You might not be aware, but a glued shower head doesn’t mean you’re stuck with it forever. Removing it safely is a straightforward process if you follow the right steps.
Key Takeaways
- Turn off water supply and protect the area before attempting to remove the shower head.
- Apply heat carefully to loosen the adhesive before trying to twist or pull the shower head.
- Use a solvent mixture to break down the glue and gently brush around the shower head.
- If the shower head is still stuck, use pliers or a wrench with penetrating oil for extra leverage.
Assess the Situation
Before tackling the removal of a glued shower head, it’s crucial to first assess the situation to understand the underlying issue and prepare accordingly. Recognizing why the old shower head is stuck is the initial step. This could be due to rust, mineral build-up, or it being overly tightened. To avoid any mishaps, ensure the water supply is cut by turning off the water. This is essential for a safe and dry work environment.
Next, safeguard your work area. Lay a thick work blanket in the shower or tub to protect the surface. Additionally, placing a cloth down the drain is a smart move to prevent any small parts from disappearing during the process.
Gathering the right tools is another vital step. Equip yourself with wrenches or pliers specifically designed to remove a stuck shower head. Sometimes, the solution to loosen a stubborn shower head involves natural remedies or heat application. You can use vinegar to dissolve mineral deposits or apply heat to melt the glue, facilitating an easier removal.
Apply Heat Carefully
Having prepared your workspace and gathered the necessary tools, it’s crucial now to focus on applying heat carefully to the glued shower head. The heat will help to loosen the adhesive holding your shower head in place, making it easier to remove. Before you start, ensure you’ve applied a penetrating lubricant, such as Liquid Wrench, to the base of the shower head. This will aid in the removal process after the heat application.
When it’s time to apply heat carefully, use a hairdryer or a heat gun on a low setting. Direct the heat evenly around the circumference of the shower head for a few minutes. Avoid overheating any single area to prevent damage to your shower head or the surrounding area. After heating, allow the area to cool slightly, giving the penetrating lubricant time to work its magic.
Next, gently use your hands to test if the shower head has loosened. If it has, attempt to remove the shower head by turning it counterclockwise. Should it remain stuck, use a wrench to turn the shower head gently. Remember, the goal is to loosen and remove your stuck showerhead safely, not to apply excessive force that could cause damage. Turn the wrench slowly, applying steady pressure until the shower head begins to move.
Use a Solvent Mixture
After applying heat, you’ll next turn your attention to using a solvent mixture to further loosen the glue securing your shower head. Removing an old, stuck shower head can be challenging, especially when it’s held in place by years of rust and mineral build-up. However, a carefully prepared solvent mixture can make this task much easier by breaking down the glue, water residue, and mineral deposits.
To effectively use a solvent mixture, follow these steps:
- Prepare the Mixture: Combine equal parts acetone nail polish remover and lemon juice. This blend is highly effective at breaking down the stubborn glue that’s keeping your shower head in place.
- Apply the Mixture: If the shower head is still attached to the shower arm, cover it with a plastic bag filled with the solvent mixture. Secure the bag using a rubber band or plumbing tape. Let it soak for at least 20 minutes to allow the solution to penetrate and loosen the glue.
- Clean Thoroughly: After soaking, gently brush around the shower head with an old toothbrush soaked in the solvent mixture. This will help remove any loosened glue, rust, or mineral build-up. Finally, rinse the shower head thoroughly with hot water to eliminate any remaining solvent residue.
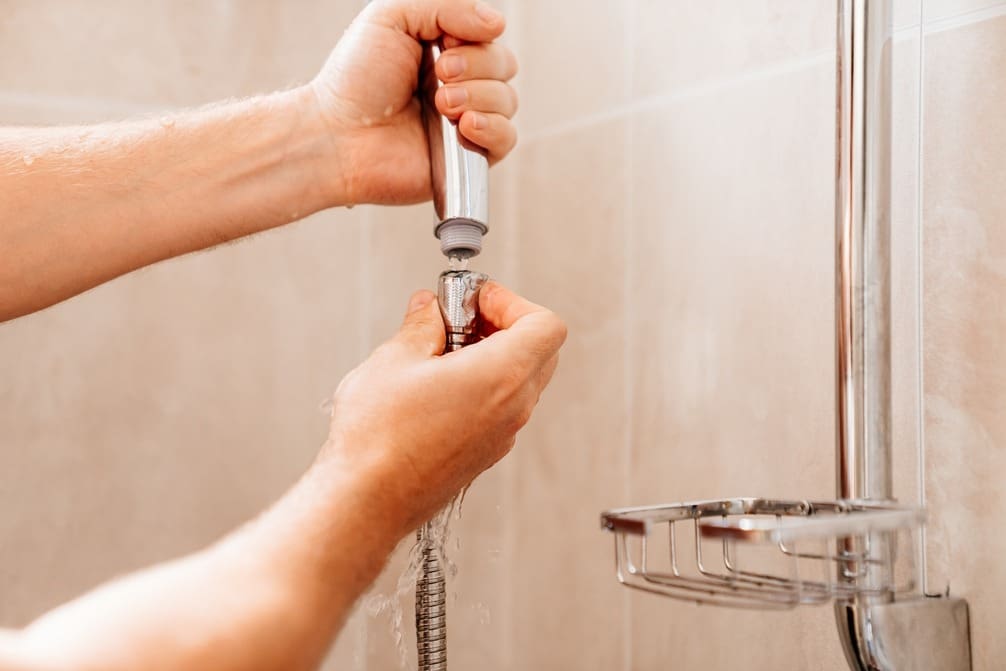
Gently Twist and Pull
Once you’ve applied the solvent mixture and allowed it to work its magic, it’s time to grip the shower head firmly with pliers or a wrench and gently twist and pull to remove it. This step is crucial in detaching the old showerhead safely and efficiently. Begin by turning the wrench or pliers clockwise to gently twist and pull, focusing on loosening your stuck shower head. If it doesn’t budge, don’t force it. Instead, try to loosen it counterclockwise to break any seal the adhesive has formed.
If the shower head remains immovable, apply penetrating oil to the threads, waiting a few minutes before attempting to twist again. This can often loosen the grip of the toughest adhesives. For stubborn cases, utilizing a pipe wrench or strap wrench can provide the extra leverage needed to coax the showerhead free without causing damage to your plumbing.
Continue this process of twisting and pulling until the shower head is completely removed. Remember, patience and gentle, consistent pressure are key. This method ensures a safe removal, protecting your bathtub and plumbing from any potential damage during the plumbing repair.
Clean and Prepare Area
With the old shower head removed, it’s crucial to thoroughly clean and prepare the area for the installation of a new fixture. Residue from water, soap, and the old adhesive can create a less than ideal surface for your new shower head. To ensure a clean, fresh start, follow these steps:
- Soak in Heavily Diluted White Vinegar: Fill a small bowl with white vinegar and immerse any removable parts of the old showerhead or the area around the pipe. Let them soak for at least an hour to break down mineral deposits and adhesive residue. Vinegar is a natural and effective cleaner that won’t harm most fixtures or plumbing.
- Scrub with an Old Toothbrush: After soaking, take an old toothbrush and gently scrub the soaked areas to remove loosened deposits. This step helps to thoroughly clean the shower by reaching into crevices where residue accumulates.
- Use Steel Wool or a Wire Brush: For stubborn adhesive or mineral deposits, gently use steel wool or a wire brush to remove the remaining residue. Be careful not to scratch the surface of the pipe or surrounding shower area.
A clean and well-prepared surface ensures that your new shower head will install seamlessly and function correctly.
Frequently Asked Questions
How Do You Remove a Shower Head That Is Glued On?
To remove a glued-on shower head, you’ll need to turn off the water, apply heat to loosen the adhesive, and then use pliers or a wrench with plumbers tape to twist it off counterclockwise.
How Do You Get a Stuck Shower Head Off?
To get a stuck shower head off, turn off the water first. Then, heat it with a hairdryer, use pliers to twist it off, and if necessary, apply penetrating oil for extra leverage.
How Do You Remove a Detachable Shower Head?
To remove a detachable shower head, you’ll unscrew it by hand from the hose. If it’s tight, gently use pliers with a cloth to protect the finish. After, clean any residue off the threads.
What Tool Do You Use to Remove a Shower Head?
To remove a shower head, you’ll need an adjustable wrench. Wrap a cloth around the wrench to avoid scratches, then twist the shower head clockwise until it’s loose enough to take off.


